Tutorial 1 注解式分布式的配置文件(最佳实践)
=======
这里以 disconf-demo/disconf-standalone-demo 某个程序片段为例,详细介绍了一个 分布式配置文件 的简单示例程序。
假设,我们的应用程序使用了Redis服务,我们将使用Jedis来进行编程。编程时,我们需要Redis的Host和Port,通常情况下,我们会把这两个参数放在配置文件里。
**本教程将以两个部分来进行**,
- 第一部分讲解正常情况下(不使用Disconf)的写法,这是我们以前常做的事情 。
- 第二部分,会在第一部分的基础上,添加Disconf的支持。从这一部分,大家就可以看到Disconf的简洁性和低侵入性。
并且,大家也可以看到关闭和开启Disconf,原有程序(第一部分)都可以正确Work。
## 第一部分:一个简单普通的Redis程序
### 第一步:准备一个配置文件 redis.properties
我们需要一个 redis.properties 文件,里面含有 Host 和 Port。文件内容是:
redis.host=127.0.0.1
redis.port=6379
我们需要把此文件放在项目的ClassPath路径下。
### 第二步:撰写配置文件相应的配置文件类
我们撰写一个类JedisConfig,它与 redis.properties 相对应。整个类的完整代码如下:
package com.example.disconf.demo.config;
import org.springframework.stereotype.Service;
/**
* Redis配置文件
*
* @author liaoqiqi
* @version 2014-6-17
*/
@Service
@Scope("singleton")
public class JedisConfig {
// 代表连接地址
private String host;
// 代表连接port
private int port;
/**
* 地址
*
* @return
*/
public String getHost() {
return host;
}
public void setHost(String host) {
this.host = host;
}
/**
* 端口
*
* @return
*/
public int getPort() {
return port;
}
public void setPort(int port) {
this.port = port;
}
}
注意,这里的Get&Set方法均是Eclipse自动生成的。
在applicationContext.xml 添加以下代码,目的是将配置值注入到此类中:
classpath*:/redis.properties
### 第三步:一个简单的Redis服务程序
我们的初衷是使用Redis服务。因此,我们需要撰写一个连接Redis的Service类,它使用的是第二步里的配置文件类。完整类的实现代码如下:
package com.example.disconf.demo.service;
import org.slf4j.Logger;
import org.slf4j.LoggerFactory;
import org.springframework.beans.factory.DisposableBean;
import org.springframework.beans.factory.InitializingBean;
import org.springframework.beans.factory.annotation.Autowired;
import org.springframework.stereotype.Service;
import redis.clients.jedis.Jedis;
import com.example.disconf.demo.config.JedisConfig;
import com.example.disconf.demo.utils.JedisUtil;
/**
* 一个简单的Redis服务
*
* @author liaoqiqi
* @version 2014-6-17
*/
@Service
@Scope("singleton")
public class SimpleRedisService implements InitializingBean, DisposableBean {
protected static final Logger LOGGER = LoggerFactory
.getLogger(SimpleRedisService.class);
// jedis 实例
private Jedis jedis = null;
/**
* 分布式配置
*/
@Autowired
private JedisConfig jedisConfig;
/**
* 关闭
*/
public void destroy() throws Exception {
if (jedis != null) {
jedis.disconnect();
}
}
/**
* 进行连接
*/
public void afterPropertiesSet() throws Exception {
jedis = JedisUtil.createJedis(jedisConfig.getHost(),
jedisConfig.getPort());
}
/**
* 获取一个值
*
* @param key
* @return
*/
public String getKey(String key) {
if (jedis != null) {
return jedis.get(key);
}
return null;
}
}
**具体步骤是:**
1. 此类实现了 InitializingBean, DisposableBean 两个接口,目的是在Bean初始化后进行Redis的连接。
2. 为此类添加 @Service ,代表它是一个Bean。Spring托管的,且 "scope" 都必须是singleton的。
### 第四步:使用SimpleRedisService
使用起来非常简单, 示例如下:
package com.example.disconf.demo.task;
import org.slf4j.Logger;
import org.slf4j.LoggerFactory;
import org.springframework.beans.factory.annotation.Autowired;
import org.springframework.stereotype.Service;
import com.example.disconf.demo.config.JedisConfig;
import com.example.disconf.demo.service.SimpleRedisService;
/**
* 演示分布式配置文件、分布式配置的更新Demo
*
* @author liaoqiqi
* @version 2014-6-17
*/
@Service
public class DisconfDemoTask {
protected static final Logger LOGGER = LoggerFactory
.getLogger(DisconfDemoTask.class);
@Autowired
private SimpleRedisService simpleRedisService;
@Autowired
private JedisConfig jedisConfig;
private static final String REDIS_KEY = "disconf_key";
/**
*
*/
public int run() {
try {
while (true) {
Thread.sleep(5000);
LOGGER.info("redis( " + jedisConfig.getHost() + ","
+ jedisConfig.getPort() + ") get key: " + REDIS_KEY
}
} catch (Exception e) {
LOGGER.error(e.toString(), e);
}
return 0;
}
}
## 第二部分:支持分布式配置(disconf)的简单Redis程序
### 第一步:添加Disconf的支持
在applicationContext.xml里添加Bean定义:
其中这里,我们定义 属性“scanPackage” 的值是 com.example.disconf.demo。
这里需要填上你的项目的Package名。这与Spring的auto scan包名功能一样。
另外,从2.6.23起,这里的 `scanPackage` 属性支持扫描多包,逗号分隔,例如:
### 第二步 项目准备
####修改扫描类
你的项目的扫描类是com.example,为了支持disconf,因此,必须添加扫描类 com.baidu ,如:
注:从版本`2.6.30`开始,不再需要扫描包`com.baidu`了,扫描自己的包即可。即:
####支持 cglib aop
使你的项目支持 cglib的aop
### 第三步:修改JedisConfig支持分布式配置
我们撰写一个类JedisConfig,它与 redis.properties 相对应。整个类的完整代码如下:
package com.example.disconf.demo.config;
import org.springframework.context.annotation.Scope;
import org.springframework.stereotype.Service;
import com.baidu.disconf.client.common.annotations.DisconfFile;
import com.baidu.disconf.client.common.annotations.DisconfFileItem;
/**
* Redis配置文件
*
* @author liaoqiqi
* @version 2014-6-17
*/
@Service
@Scope("singleton")
@DisconfFile(filename = "redis.properties")
public class JedisConfig {
// 代表连接地址
private String host;
// 代表连接port
private int port;
/**
* 地址, 分布式文件配置
*
* @return
*/
@DisconfFileItem(name = "redis.host", associateField = "host")
public String getHost() {
return host;
}
public void setHost(String host) {
this.host = host;
}
/**
* 端口, 分布式文件配置
*
* @return
*/
@DisconfFileItem(name = "redis.port", associateField = "port")
public int getPort() {
return port;
}
public void setPort(int port) {
this.port = port;
}
}
**具体步骤是:**
1. 为这个类 JedisConfig 定义 @DisconfFile 注解,必须指定文件名为 redis.properties 。
2. 定义域 host port,分别表示Host和Port。并使用Eclipse为其自动生成 get&set 方法。
3. 为这两个域的get方法上添加注解 @DisconfFileItem 。添加标记 name, 表示配置文件中的KEY名,这是必填的。标记associateField是可选的,它表示此get方法相关连的域的名字,如果此标记未填,则系统会自动分析get方法,猜测其相对应于域名。强烈建议添加associateField标记,这样就可以避免Eclipse生成的Get/Set方法不符合Java规范的问题。
4. 标记它为Spring托管的类 (使用@Service),且 "scope" 都必须是singleton的。
**注意:**
Eclipse自动生成的get方法,可能与Java的规范不同。这会导致很多问题。因此,建议加上 associateField 标记。
### 第四步:添加 disconf.properties
**准备disconf.properties文件:**
Disconf启动需要此文件,文件示例是:
# 是否使用远程配置文件
# true(默认)会从远程获取配置 false则直接获取本地配置
enable.remote.conf=true
#
# 配置服务器的 HOST,用逗号分隔 127.0.0.1:8000,127.0.0.1:8000
#
conf_server_host=127.0.0.1:8080
# 版本, 请采用 X_X_X_X 格式
version=1_0_0_0
# APP 请采用 产品线_服务名 格式
app=disconf_demo
# 环境
env=rd
# debug
debug=true
# 忽略哪些分布式配置,用逗号分隔
ignore=
# 获取远程配置 重试次数,默认是3次
conf_server_url_retry_times=1
# 获取远程配置 重试时休眠时间,默认是5秒
conf_server_url_retry_sleep_seconds=1
配置相关说明可参考:[配置](../config/client-config.html)
注意:如果使用Disconf,则本地的配置文件`redis.properties`可以删除掉(也可以不删除掉,建议删除掉)。如果不使用Disconf,则需要此配置文件。
### 第五步:在`disconf-web`上上传配置文件(`redis.properties`)
当你的程序启动时,disconf就会帮忙你的程序去获取配置文件。那如何让disconf知道你的配置呢?答案是需要在disconf-web上传配置文件哦。
点击主页面的新建配置文件按钮:

进入页面后就可以上传 配置文件了

### 第六步:在`disconf-web`上查看
你在第五步上传了配置文件 redis.properties ,那么 ,当你的程序启动时,disconf就会帮忙你的程序去获取配置文件。
可以看到已经有一个实例在使用redis.properties了。
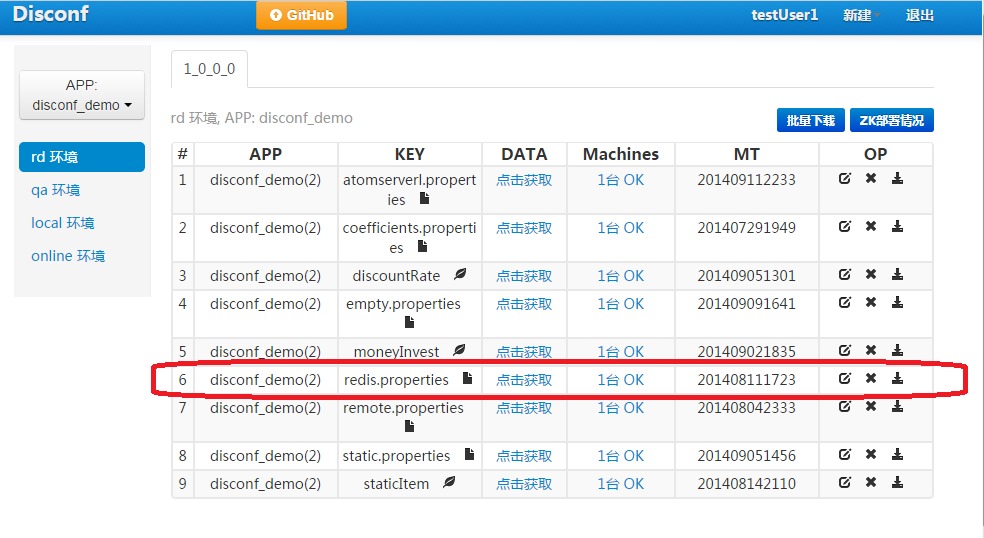
点击查看它的详情,可以看到,确实是我的实例在使用它。

### 完结 ##
至此,分布式配置文件的撰写就已经写完了。
可以看到,基于注解的方式,不需要在xml定义 java bean(config类).
#### 使用方便
大家可以看到,第一次使用时,需要
- 在`applicationContext.xml`添加Disconf启动支持
- 使用注解方式 修改配置类
- 添加`disconf.properties`
- 在`disconf-web`上上传配置文件
非第一次使用时,需要
- 使用注解方式 修改配置类
- 在`disconf-web`上上传配置文件
就可以支持分布式配置了。
#### 强兼容性
并且,如果将 `disconf.disconf.properties` 中的 `enable.remote.conf` 设置为 `false`
那么,分布式配置就会失效,退化为 使用本地配置方式(即第一部分的功能)。(如果是这种情况,你必须确认你本地留有相应的配置文件。
一般来说,只要成功跑过一次基于disconf的程序,那么classpath目录下就会有此程序的所有相应配置文件。)
并且,如果 disconf-web无法正常服务(`conf_server_host=127.0.0.1:8080`),分布式配置也会失效,退化为 使用本地配置方式(即第一部分的功能)。(如果是这种情况,你必须确认你本地留有相应的配置文件)
也就是说,Disconf是具有兼容性的
- 当开启Disconf时,
- 如果Disconf正常运行,则正常使用分布式配置。
- 如果Disconf非正常运行,则使用本地配置。(Disconf可以保证在Disconf失败时,原有程序能够按原有逻辑正确运行)
- 当不开启Disconf时, 则使用本地配置。
**注:**
1. 只要是运行一次分布式程序成功,则本地就含有最全的配置文件。此时,如果再运行一次分布式程序,如果出现失败,则上一次下载成功的配置文件就会当成本地配置生效,程序成功启动。
## END