本文档介绍了如何在本地使用IDE编译、运行Apollo,从而可以帮助大家了解Apollo的内在运行机制,同时也为自定义开发做好准备。
#
# 一、准备工作
## 1.1 本地运行时环境
Apollo本地开发需要以下组件:
1. Java: 1.8+
2. MySQL: 5.6.5+
3. IDE: 没有特殊要求
其中MySQL需要创建Apollo数据库并导入基础数据。
具体步骤请参考[分布式部署指南](zh/deployment/distributed-deployment-guide)中的以下部分:
1. [一、准备工作](zh/deployment/distributed-deployment-guide#一、准备工作)
2. [2.1 创建数据库](zh/deployment/distributed-deployment-guide#_21-创建数据库)
## 1.2 Apollo总体设计
具体请参考[Apollo配置中心设计](zh/design/apollo-design)
# 二、本地启动
## 2.1 Apollo Config Service和Apollo Admin Service
我们在本地开发时,一般会在IDE中同时启动`apollo-configservice`和`apollo-adminservice`。
下面以Intellij Community 2016.2版本为例来说明如何在本地启动`apollo-configservice`和`apollo-adminservice`。
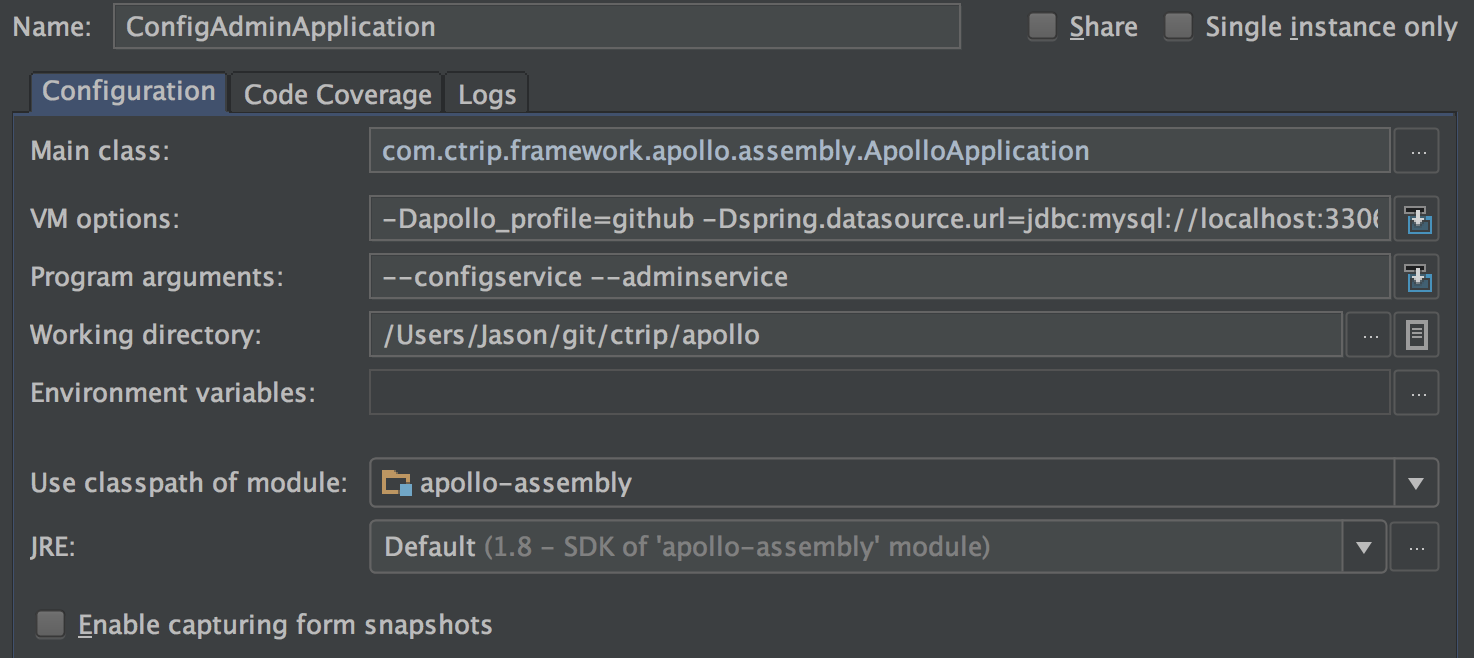
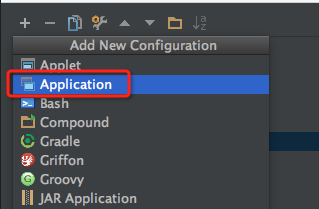
### 2.1.1 新建运行配置
### 2.1.2 Main class配置
`com.ctrip.framework.apollo.assembly.ApolloApplication`
> 注:如果希望独立启动`apollo-configservice`和`apollo-adminservice`,可以把Main Class分别换成
> `com.ctrip.framework.apollo.configservice.ConfigServiceApplication`和
> `com.ctrip.framework.apollo.adminservice.AdminServiceApplication`
### 2.1.3 VM options配置
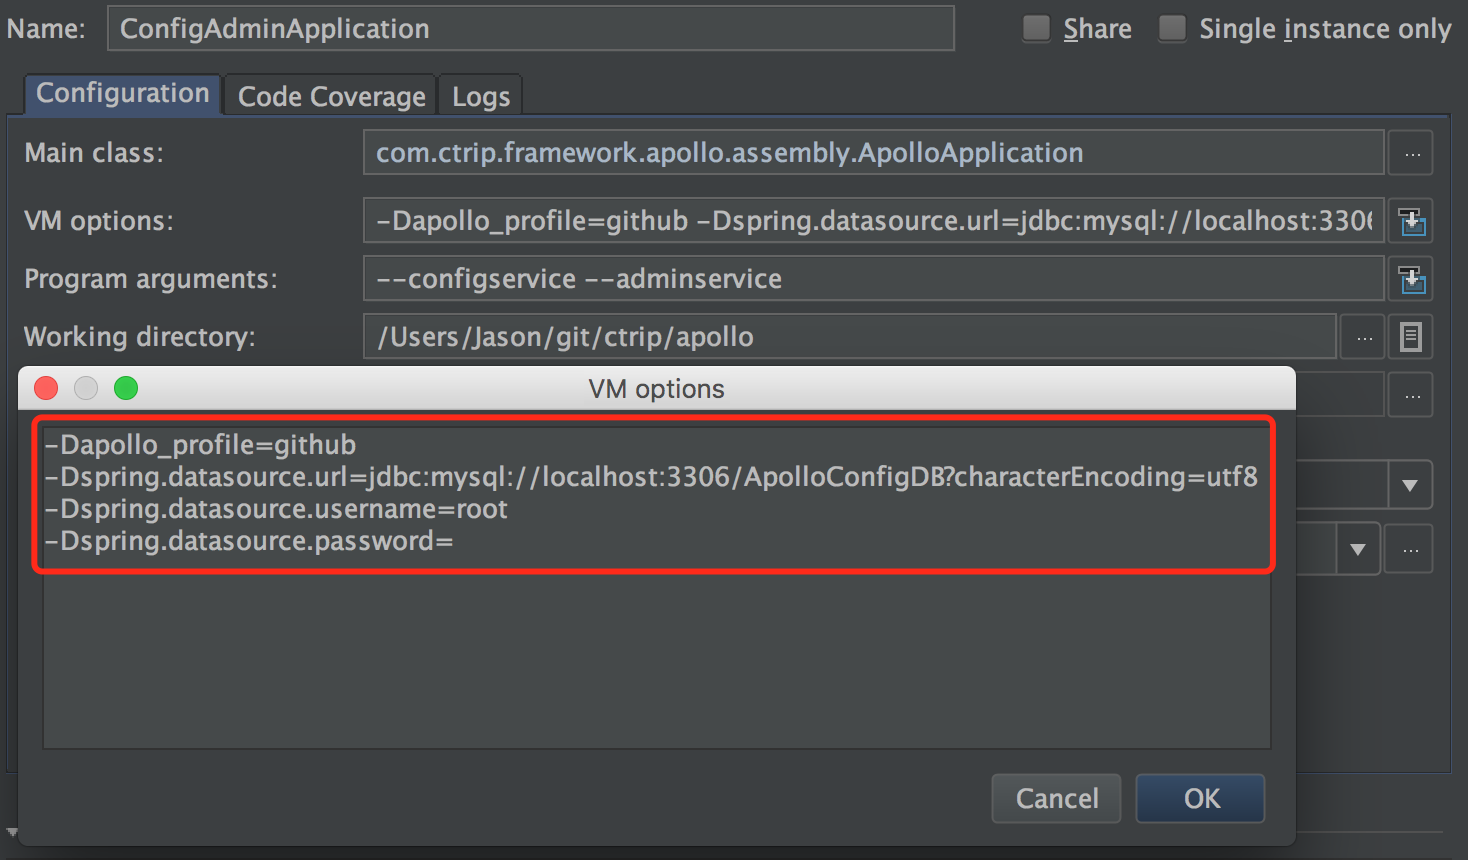
-Dapollo_profile=github
-Dspring.datasource.url=jdbc:mysql://localhost:3306/ApolloConfigDB?characterEncoding=utf8
-Dspring.datasource.username=root
-Dspring.datasource.password=
>注1:spring.datasource相关配置替换成你自己的数据库连接信息,注意数据库是`ApolloConfigDB`
>
>注2:程序默认日志输出为/opt/logs/100003171/apollo-assembly.log,如果需要修改日志文件路径,可以增加`logging.file.name`参数,如下:
>
>-Dlogging.file.name=/your-path/apollo-assembly.log
### 2.1.4 Program arguments配置
`--configservice --adminservice`
### 2.1.5 运行
对新建的运行配置点击Run或Debug皆可。

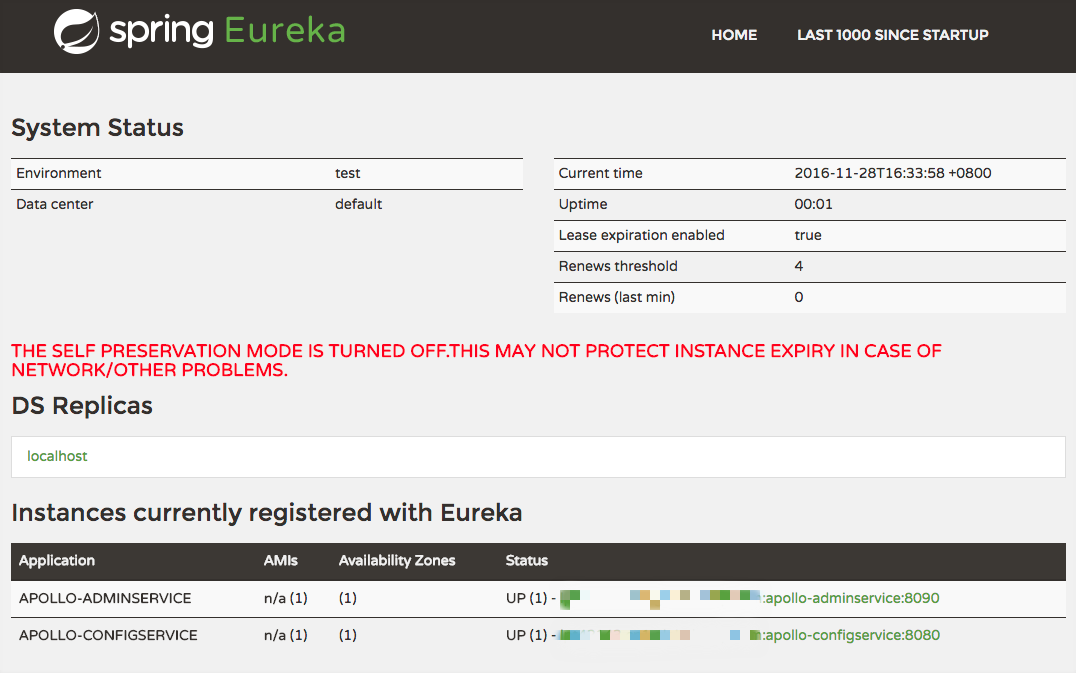
启动完后,打开[http://localhost:8080](http://localhost:8080)可以看到`apollo-configservice`和`apollo-adminservice`都已经启动完成并注册到Eureka。
> 注:除了在Eureka确认服务状态外,还可以通过健康检查接口确认服务健康状况:
>
> apollo-adminservice: [http://localhost:8090/health](http://localhost:8090/health)
> apollo-configservice: [http://localhost:8080/health](http://localhost:8080/health)
>
> 如果服务健康,返回内容中的status.code应当为`UP`:
>
> {
> "status": {
> "code": "UP",
> ...
> },
> ...
> }
## 2.2 Apollo-Portal
下面以Intellij Community 2016.2版本为例来说明如何在本地启动`apollo-portal`。
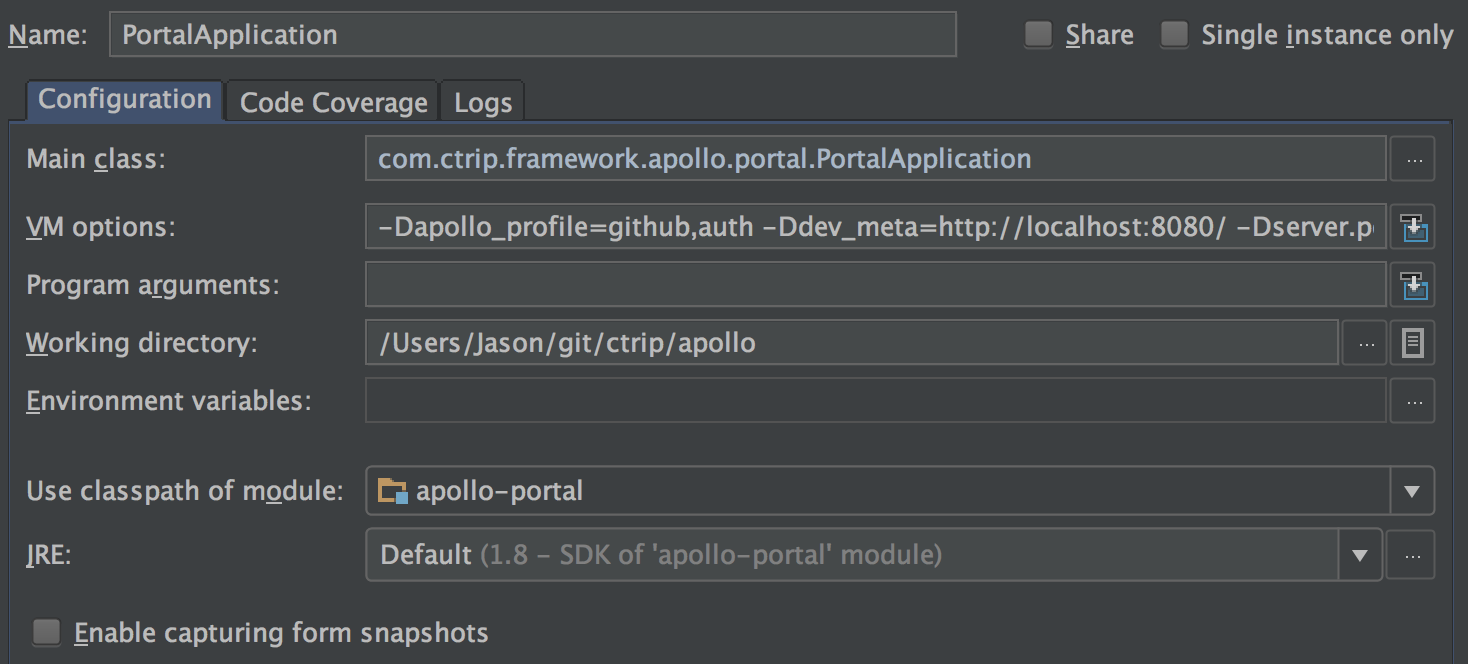
### 2.2.1 新建运行配置

### 2.2.2 Main class配置
`com.ctrip.framework.apollo.portal.PortalApplication`
### 2.2.3 VM options配置
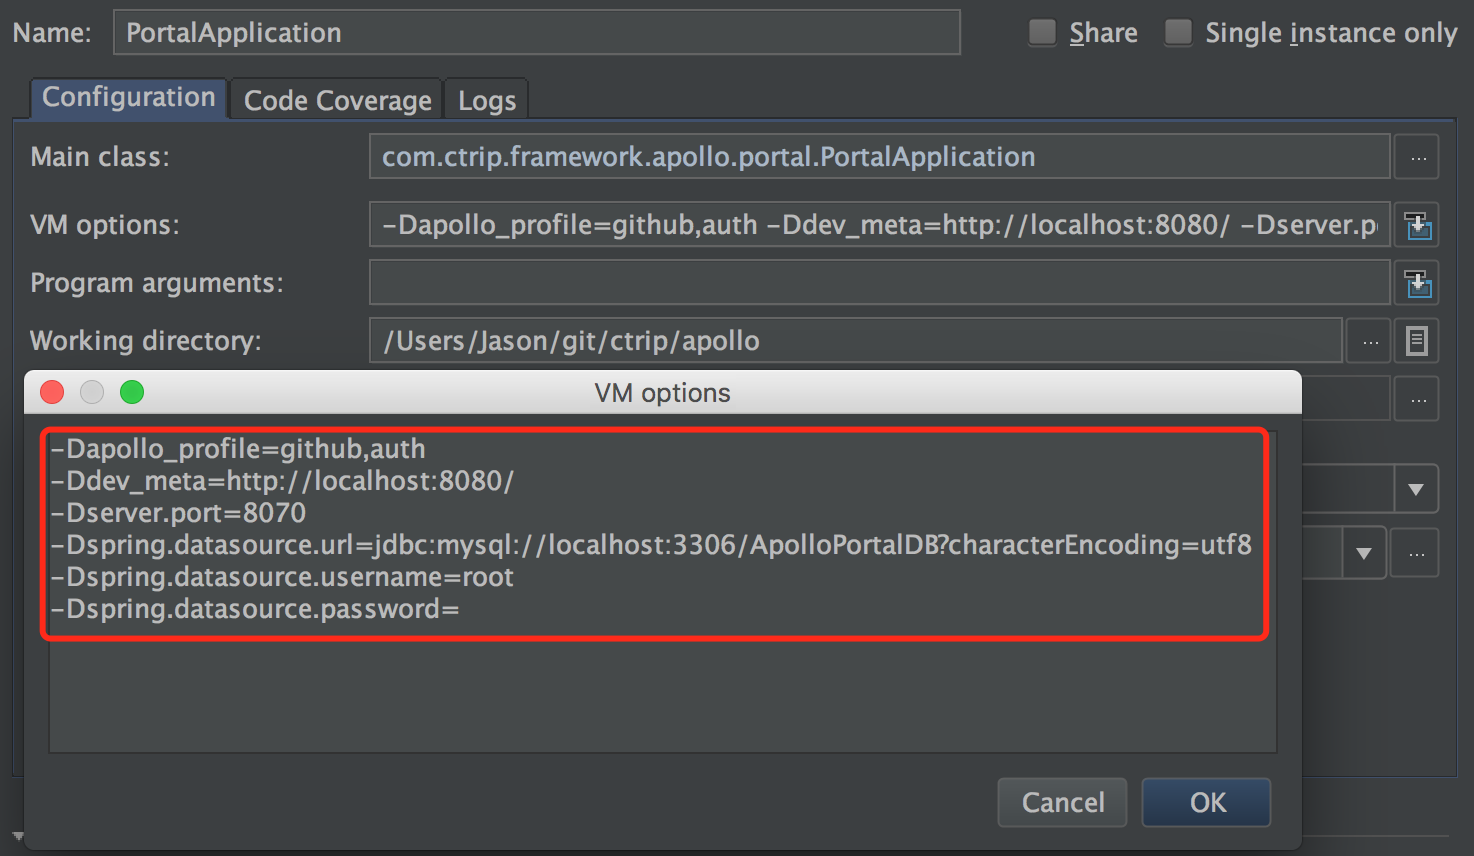
-Dapollo_profile=github,auth
-Ddev_meta=http://localhost:8080/
-Dserver.port=8070
-Dspring.datasource.url=jdbc:mysql://localhost:3306/ApolloPortalDB?characterEncoding=utf8
-Dspring.datasource.username=root
-Dspring.datasource.password=
>注1:这里指定了apollo_profile是`github`和`auth`,其中`github`是Apollo必须的一个profile,用于数据库的配置,`auth`是从0.9.0新增的,用来支持使用apollo提供的Spring Security简单认证,更多信息可以参考[Portal-实现用户登录功能](zh/development/portal-how-to-implement-user-login-function)
>
>注2:spring.datasource相关配置替换成你自己的数据库连接信息,注意数据库是`ApolloPortalDB `。
>
>注3:默认ApolloPortalDB中导入的配置只会展示DEV环境的配置,所以这里配置了dev\_meta属性,如果你希望在本地展示其它环境的配置,需要在这里增加其它环境的meta服务器地址,如fat\_meta。
>
>注4:这里指定了server.port=8070是因为`apollo-configservice`启动在8080端口,所以这里配置`apollo-portal`启动在8070端口。
>
>注5:程序默认日志输出为/opt/logs/100003173/apollo-portal.log,如果需要修改日志文件路径,可以增加`logging.file.name`参数,如下:
>
>-Dlogging.file.name=/your-path/apollo-portal.log
### 2.2.4 运行
对新建的运行配置点击Run或Debug皆可。

启动完后,打开[http://localhost:8070](http://localhost:8070)就可以看到Apollo配置中心界面了。
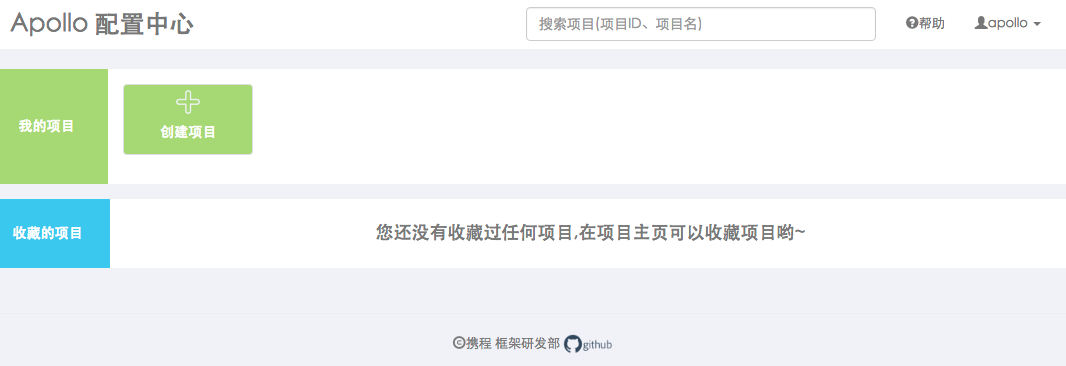
>注:如果启用了`auth` profile的话,默认的用户名是apollo,密码是admin
### 2.2.5 Demo应用接入
为了更好的开发和调试,一般我们都会自己创建一个demo项目给自己使用。
可以参考[一、普通应用接入指南](zh/usage/apollo-user-guide#一、普通应用接入指南)创建自己的demo项目。
## 2.3 Java样例客户端启动
项目中有一个样例客户端的项目:`apollo-demo`,下面以Intellij Community 2016.2版本为例来说明如何在本地启动。
### 2.3.1 配置项目AppId
在`2.2.5 Demo应用接入`中创建Demo项目时,系统会要求填入一个全局唯一的AppId,我们需要把这个AppId配置到`apollo-demo`项目的app.properties文件中:`apollo-demo/src/main/resources/META-INF/app.properties`。

如我们自己的demo项目使用的AppId是100004458,那么文件内容就是:
app.id=100004458
>注:AppId是应用的唯一身份标识,Apollo客户端使用这个标识来获取应用自己的私有Namespace配置。
> 对于公共Namespace的配置,没有AppId也可以获取到配置,但是就失去了应用覆盖公共Namespace配置的能力。
> 更多配置AppId的方式可以参考[1.2.1 AppId](zh/usage/java-sdk-user-guide#_121-appid)
### 2.3.2 新建运行配置

### 2.3.3 Main class配置
`com.ctrip.framework.apollo.demo.api.SimpleApolloConfigDemo`
### 2.3.4 VM options配置

-Dapollo.meta=http://localhost:8080
> 注:这里当前环境的meta server地址为`http://localhost:8080`,也就是`apollo-configservice`的地址。
> 更多配置Apollo Meta Server的方式可以参考[1.2.2 Apollo Meta Server](zh/usage/java-sdk-user-guide#_122-apollo-meta-server)
### 2.3.5 概览

### 2.3.6 运行
对新建的运行配置点击Run或Debug皆可。

启动完后,忽略前面的调试信息,可以看到如下提示:
Apollo Config Demo. Please input key to get the value. Input quit to exit.
>
输入你之前在Portal上配置的值,如我们的Demo项目中配置了`timeout`,会看到如下信息:
> timeout
> [SimpleApolloConfigDemo] Loading key : timeout with value: 100
> 客户端日志级别默认是`DEBUG`,如果需要调整,可以通过修改`apollo-demo/src/main/resources/log4j2.xml`中的level配置
> ```xml
>
>
>
> ```
## 2.4 .Net样例客户端启动
[apollo.net](https://github.com/ctripcorp/apollo.net)项目中有一个样例客户端的项目:`ApolloDemo`,下面就以VS 2010为例来说明如何在本地启动。
### 2.4.1 配置项目AppId
在`2.2.5 Demo应用接入`中创建Demo项目时,系统会要求填入一个全局唯一的AppId,我们需要把这个AppId配置到`ApolloDemo`项目的APP.config文件中:`apollo.net\ApolloDemo\App.config`。
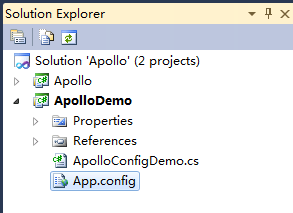
如我们自己的demo项目使用的AppId是100004458,那么文件内容就是:
```xml
```
>注:AppId是应用的唯一身份标识,Apollo客户端使用这个标识来获取应用自己的私有Namespace配置。
> 对于公共Namespace的配置,没有AppId也可以获取到配置,但是就失去了应用覆盖公共Namespace配置的能力。
### 2.4.2 配置服务地址
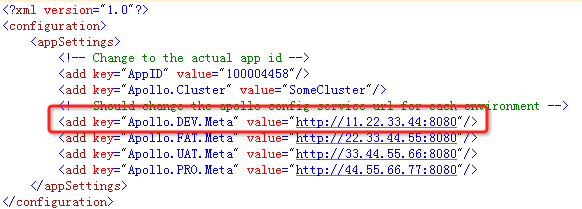
Apollo客户端针对不同的环境会从不同的服务器获取配置,所以我们需要在app.config或web.config配置服务器地址(Apollo.{ENV}.Meta)。假设DEV环境的配置服务(apollo-configservice)地址是11.22.33.44,那么我们就做如下配置:
### 2.4.3 运行
运行`ApolloConfigDemo.cs`即可。
启动完后,忽略前面的调试信息,可以看到如下提示:
Apollo Config Demo. Please input key to get the value. Input quit to exit.
>
输入你之前在Portal上配置的值,如我们的Demo项目中配置了`timeout`,会看到如下信息:
> timeout
> Loading key: timeout with value: 100
>注:Apollo .Net客户端开源版目前默认会把日志直接输出到Console,大家可以自己实现Logging相关功能。
>
> 详见[https://github.com/ctripcorp/apollo.net/tree/master/Apollo/Logging/Spi](https://github.com/ctripcorp/apollo.net/tree/master/Apollo/Logging/Spi)
# 三、开发
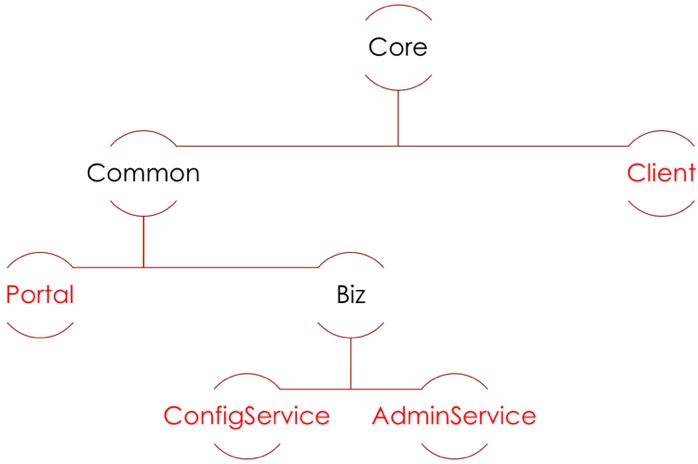
## 模块依赖图
## 3.1 Portal 实现用户登录功能
请参考[Portal 实现用户登录功能](zh/development/portal-how-to-implement-user-login-function)
## 3.2 Portal 接入邮件服务
请参考[Portal 接入邮件服务](zh/development/portal-how-to-enable-email-service)
## 3.3 Portal 集群部署时共享 session
请参考[Portal 共享 session](zh/development/portal-how-to-enable-session-store)